No edit summary |
No edit summary |
||
| (12 intermediate revisions by the same user not shown) | |||
| Line 1: | Line 1: | ||
On this page you will learn how to: | On this page you will learn how to: | ||
*Set up your own MSP Challenge server sessions after installing the full platform | *Set up your own MSP Challenge server sessions after installing the full platform; | ||
*Managing your own MSP Challenge server session using the Server Manager application | *Managing your own MSP Challenge server session using the Server Manager application. | ||
This manual assumes you've installed the full platform one way or another, and are ready to get started with the Server Manager application as explained at the end of the [[Installation Manual|installation manual page concerning the full platform]]. | |||
==Setting up a new MSP Challenge server session== | ==Setting up a new MSP Challenge server session== | ||
To create a new server session - or to put it in other terms - to create a new instance of for example the North Sea, open your Server Manager web application ( | To create a new server session - or to put it in other terms - to create a new instance of for example the North Sea, open your Server Manager web application (for more information, see the [[Installation Manual|full platform installation manual]]), and from there, here's what you do next:<gallery mode="slideshow"> | ||
File:ServerManager - sessions.png|Click on the New Session button under the Sessions tab. | File:Server Manager - new installation.png|When you open the Server Manager for the first time, you might be asked to log in first with your MSP Challenge account. Afterwards, you should see this notice. Read it carefully, and click through using the provided link. | ||
File:ServerManager - sessions.png|You will now see an empty sessions list, which makes sense as this is a fresh installation. Click on the New Session button under the Sessions tab to get started. | |||
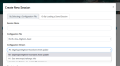
File:ServerManager - create new session.png|Fill in the form. At least enter a name, select the configuration of choice, and enter an administrator password. When you're ready, click on the Create Session button. | File:ServerManager - create new session.png|Fill in the form. At least enter a name, select the configuration of choice, and enter an administrator password. When you're ready, click on the Create Session button. | ||
File:ServerManager - creation in progress.png|The session creation process should now start. You will get a confirmation message, and a new window in the bottom-right corner will pop up showing the progress. Please be patient. | File:ServerManager - creation in progress.png|The session creation process should now start. You will get a confirmation message, and a new window in the bottom-right corner will pop up showing the progress. Please be patient. | ||
| Line 13: | Line 15: | ||
=== Are you using your own GeoServer? === | === Are you using your own GeoServer? === | ||
If you want to use your own GeoServer installation, then add it before setting up a new server session:< | If you want to use your own GeoServer installation, then add it before setting up a new server session:<gallery mode="slideshow"> | ||
==Managing MSP Challenge server session == | File:Server Manager - settings.png|Back in your Server Manager, click on the Settings tab, and then click on the Change button in the GeoServers column. | ||
File:Server Manager - add geoserver.png|To add your new GeoServer, fill in the form. Be sure to enter a fully-qualified base URL to your GeoServer. Enter a username and password with which MSP Challenge can access GeoServer to retrieve/get layer data (no additional privileges required). When you're ready, click on Add. | |||
File:Server Manager - manage geoservers.png|The GeoServers window will close again. If you now click on Change again, the window re-opens and should show the additional GeoServer in the list at the top. If you want to use your new GeoServer as the default when creating new sessions, click on the eye icon next to the top 'Default: the public MSP Challenge GeoServer' entry to make it invisible. | |||
File:Server Manager - create session with other GeoServer.png|If you go back to the Sessions tab, and click on New Session button, you'll notice that your additional GeoServer has become available under the GeoServer dropdown list. If you made the Default BUas GeoServer invisible, it won't even show up here at all. | |||
</gallery> | |||
==Managing MSP Challenge server sessions == | |||
<gallery mode="slideshow"> | |||
File:Server Manager quick actions.png|Once a session has been created, you can manipulate it in different ways. The Quick Action buttons on the right give you the options to play and pause the simulations, save the session in its current state, or view more session details (the i - icon). | |||
File:Server Manager session details.png|If you click on the i - icon to get the session details, a new window opens up, showing you the current state of the session, and providing you with more options. You also have access to the session creation log from here. | |||
File:Server Manager play pause fast-forward demo.png|In the session details window, you'll see the play and pause buttons as well. You'll also see a button to fast-forward the simulations through the current era. There's also a button to enable demo mode. If you click, you'll get a message first explaining what that does, which you can then cancel or confirm. | |||
File:Server Manager session recreate and archive.png|You'll also see recreate and archive session buttons. The former will recreate the session using the originally specified configuration file, GeoServer, passwords, etc. If you do this, everything that already happened on the server will be lost. The latter just archives the session, making it unavailable to end-users. Again, everything that already happened on the server will be lost. | |||
File:Server Manager save options.png|With the save buttons you can either save the session in its current state as a ZIP file (which you'll be able to download and optionally reload again as another session), or just save all the data layers as ShapeFiles (including any plans end-users made to change them) and raster files into one ZIP file (which you'll just be able to download). | |||
File:Server Manager export plans and set user access.png|These two options are more advanced options, explained separately below. | |||
</gallery> | |||
== Advanced MSP Challenge Server Manager options == | |||
<gallery mode="slideshow"> | |||
File:Server Manager export plans and set user access.png|In the session details window, the Export with Current Plans buttons will allow you to download the configuration file with which the session was created, now including all the plans that end-users made. You can then use this configuration file to create new sessions with all those plans already included. | |||
File:Server Manager set user access.png|Set User Access gives you more options for defining how end-users can access your session using the MSP Challenge client. For example, you can specify passwords per country team (instead of all country teams having the same password, which is the default when you create a session). You can also let end-users log in with their MSP Challenge username and password. | |||
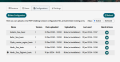
File:Server Manager saves list.png|When you save a session, the save will show up under the Saves tab. This Saves tab also provides some Quick Action buttons per save. You can download the ZIP file immediately, view the save details, and in the case of a full session save (so ''not'' the layer-only save) you can reload the save into a new session. | |||
File:Server Manager save details.png|When you click on the save details i - icon, you will see some more details about this particular save. You can add some notes about this session save (for example, about the state of planning at the time of the save). You can also archive this save, if you don't want to use it any more. | |||
File:Server Manager - reload save.png|If you click on the Load button, you'll be able to load the save into a new session. A form will pop up, with pre-filled content. You might want to change the new of this re-loaded session. Click on Create Session when you're ready. The process will take a couple of minutes. | |||
File:Server Manager - configurations list.png|Under the Configurations tab, you'll see a list of configuration files available to you. The only quick action button available here is the button to view configuration file details. From there you can download a configuration file of choice, which you could then alter using the [[Customise your session|Configuration Editor]] for example, or just through your favourite text editor. | |||
File:Server Manager - add configuration.png|If you edited or created a configuration file and wish to use it to create a new session in the Server Manager, then click on the New Configuration button. A form will appear. Select the file stored on your computer using the Browse button. Then indicate whether this new configuration file is actually a new version of an existing configuration, or a completely new configuration altogether. Be sure to provide appropriate general descriptions. Click Upload Configuration File when ready. | |||
File:Server Manager - create session with new configuration.png|Once successful, you'll be able to select your newly added configuration file from the list when you create a new session. In this example, we uploaded a new ''version'' of an existing configuration file 'North_Sea_Digitwin_basic', so from the first dropdown list you would select that, and from the second ''version'' dropdown list, you would select the new version. | |||
</gallery> | |||
__NOTOC__ | |||
Latest revision as of 08:38, 3 May 2024
On this page you will learn how to:
- Set up your own MSP Challenge server sessions after installing the full platform;
- Managing your own MSP Challenge server session using the Server Manager application.
This manual assumes you've installed the full platform one way or another, and are ready to get started with the Server Manager application as explained at the end of the installation manual page concerning the full platform.
Setting up a new MSP Challenge server session
To create a new server session - or to put it in other terms - to create a new instance of for example the North Sea, open your Server Manager web application (for more information, see the full platform installation manual), and from there, here's what you do next:
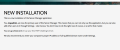
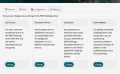
When you open the Server Manager for the first time, you might be asked to log in first with your MSP Challenge account. Afterwards, you should see this notice. Read it carefully, and click through using the provided link.

You will now see an empty sessions list, which makes sense as this is a fresh installation. Click on the New Session button under the Sessions tab to get started.
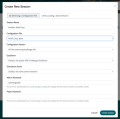
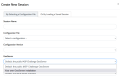
Fill in the form. At least enter a name, select the configuration of choice, and enter an administrator password. When you're ready, click on the Create Session button.
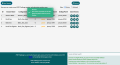
The session creation process should now start. You will get a confirmation message, and a new window in the bottom-right corner will pop up showing the progress. Please be patient.
At some point, the new session's state should change from 'request' to 'setup'. The progress window in the bottom-right corner should indicate that the session creation process finished. The session can now be accessed through the MSP Challenge client.


Are you using your own GeoServer?
If you want to use your own GeoServer installation, then add it before setting up a new server session:
Back in your Server Manager, click on the Settings tab, and then click on the Change button in the GeoServers column.
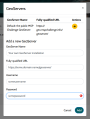
To add your new GeoServer, fill in the form. Be sure to enter a fully-qualified base URL to your GeoServer. Enter a username and password with which MSP Challenge can access GeoServer to retrieve/get layer data (no additional privileges required). When you're ready, click on Add.
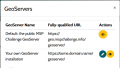
The GeoServers window will close again. If you now click on Change again, the window re-opens and should show the additional GeoServer in the list at the top. If you want to use your new GeoServer as the default when creating new sessions, click on the eye icon next to the top 'Default: the public MSP Challenge GeoServer' entry to make it invisible.
If you go back to the Sessions tab, and click on New Session button, you'll notice that your additional GeoServer has become available under the GeoServer dropdown list. If you made the Default BUas GeoServer invisible, it won't even show up here at all.


Managing MSP Challenge server sessions

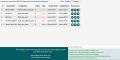
Once a session has been created, you can manipulate it in different ways. The Quick Action buttons on the right give you the options to play and pause the simulations, save the session in its current state, or view more session details (the i - icon).
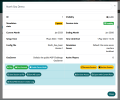
If you click on the i - icon to get the session details, a new window opens up, showing you the current state of the session, and providing you with more options. You also have access to the session creation log from here.

In the session details window, you'll see the play and pause buttons as well. You'll also see a button to fast-forward the simulations through the current era. There's also a button to enable demo mode. If you click, you'll get a message first explaining what that does, which you can then cancel or confirm.

You'll also see recreate and archive session buttons. The former will recreate the session using the originally specified configuration file, GeoServer, passwords, etc. If you do this, everything that already happened on the server will be lost. The latter just archives the session, making it unavailable to end-users. Again, everything that already happened on the server will be lost.

With the save buttons you can either save the session in its current state as a ZIP file (which you'll be able to download and optionally reload again as another session), or just save all the data layers as ShapeFiles (including any plans end-users made to change them) and raster files into one ZIP file (which you'll just be able to download).

These two options are more advanced options, explained separately below.

Advanced MSP Challenge Server Manager options
In the session details window, the Export with Current Plans buttons will allow you to download the configuration file with which the session was created, now including all the plans that end-users made. You can then use this configuration file to create new sessions with all those plans already included.
Set User Access gives you more options for defining how end-users can access your session using the MSP Challenge client. For example, you can specify passwords per country team (instead of all country teams having the same password, which is the default when you create a session). You can also let end-users log in with their MSP Challenge username and password.
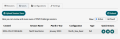
When you save a session, the save will show up under the Saves tab. This Saves tab also provides some Quick Action buttons per save. You can download the ZIP file immediately, view the save details, and in the case of a full session save (so not the layer-only save) you can reload the save into a new session.
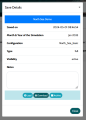
When you click on the save details i - icon, you will see some more details about this particular save. You can add some notes about this session save (for example, about the state of planning at the time of the save). You can also archive this save, if you don't want to use it any more.

If you click on the Load button, you'll be able to load the save into a new session. A form will pop up, with pre-filled content. You might want to change the new of this re-loaded session. Click on Create Session when you're ready. The process will take a couple of minutes.
Under the Configurations tab, you'll see a list of configuration files available to you. The only quick action button available here is the button to view configuration file details. From there you can download a configuration file of choice, which you could then alter using the Configuration Editor for example, or just through your favourite text editor.
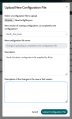
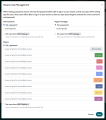
If you edited or created a configuration file and wish to use it to create a new session in the Server Manager, then click on the New Configuration button. A form will appear. Select the file stored on your computer using the Browse button. Then indicate whether this new configuration file is actually a new version of an existing configuration, or a completely new configuration altogether. Be sure to provide appropriate general descriptions. Click Upload Configuration File when ready.
Once successful, you'll be able to select your newly added configuration file from the list when you create a new session. In this example, we uploaded a new version of an existing configuration file 'North_Sea_Digitwin_basic', so from the first dropdown list you would select that, and from the second version dropdown list, you would select the new version.


 Co-funded by the European Union.