Process overview
Updating or adding a data layer in an MSP Challenge Simulation Platform Edition is a two-fold process:
- First, you need to store the geodata somewhere accessible through a GeoServer Web Map Service (WMS) or Web Feature Service (WFS) installation.
- Second, you need to tell the MSP Challenge server what the name of the geodata layer is, and which GeoServer WMS/WFS installation provides it.
Adding geodata to a GeoServer installation
A basic explanation of how to use GeoServer is beyond the scope of this page. There are good manuals on the GeoServer website about how to install and configure a new GeoServer installation.
Once you have a GeoServer installation at your disposal, you can start adding geodata to it. GeoServer supports many different geodata standards. You can, for example, manually upload ESRI ShapeFiles of your vector geodata or raster .TIFF or .PNG files into GeoServer.
Often this won't be what you'll want to do. We know that a lot of geodata is already 'out there', available for anyone to reuse freely.
Storing raster geodata from a pre-existing WMS in your GeoServer:
- Go to your GeoServer management web interface (usually accessible through /geoserver), logging in with a full administrator-privileged user.
- Click on Stores > Add new Store to start the process of adding a new data store.
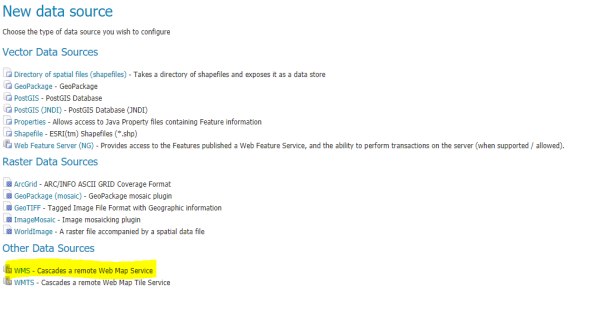
- In the New data source options list, choose the WMS cascade option under Other Data Sources.
- In the form that shows up, you'll first need to select a Workspace for this data store. All your geodata (vector or raster) will need to be in the same Workspace. If you like, you can first create a new Workspace by going to Workspaces > Add new Workspace. More information about GeoServer Workspaces is available here.
- Under WMS Source Name, enter a name for this new data store. You will need to use this name in a couple of steps, when you add a new data layer.
- A Description is optional. Write anything you like or need.
- Make sure the Enabled box is checked.
- Under Capabilities URL, enter the WMS base URL of the service you are accessing. An example of a fully-qualified WMS base URL is: https://ows.emodnet-bathymetry.eu/wms This is the Web Map Service of EMODnet Bathymetry.
- All other fields in the form are optional and can be left as is. This includes things such as username, password, and connection parameters.
- Click on Save.
- Now you need to retrieve an actual geodata layer from this new data store, a 'cascade' of a pre-existing WMS.
- So go to Layers > Add a new layer.
- In the drop-down list, select the name of the data store, as you provided a couple of steps up under WMS Source Name.
- If the WMS base URL was correct, GeoServer will query it now immediately and provide a list of layers that this WMS source actually provides.
- Select the layer you actually want, and click on the Publish button to the right of it.
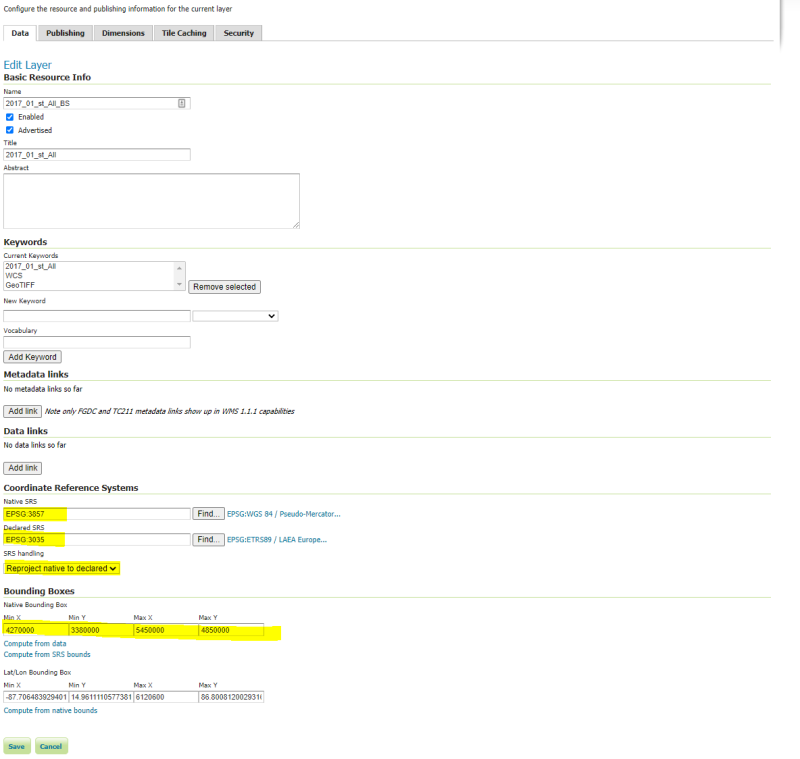
- Check the native coordinate reference system of this data layer, and select the declared coordinate reference system to whatever is required for the particular MSP Challenge configuration file. Usually this is EPSG:3035, but do check with the projection variable in the configuration file at hand. Either way, make sure the coordinate reference system handling is selected as "reproject native to declared".
- If you only want a part of the image you can enter the bounds of the box you want to retrieve, using of course the coordinate reference system at hand (e.g. EPSG:3035).
- Go to the next Publishing tab, and select PNG extension to ensure MSP Challenge can obtain the raster as a PNG file. You may also save an attribution text and set up a logo, etc. but this is all optional.
- Click on Save.


How to deal with the configuration file is covered in Customise your session. In this section we will cover how to prepare your geo-data to integrate it in the MSP Challenge Simulation Platform.
Formats accepted
The MSP Challenge accepts both vector and raster formats. For vector data, the platform uses shapefiles[2], and for raster data GeoTIFF[3] (Geographic Tagged Image File Format).
To use shapefiles in the platform only the files with extension .shp, .dbf, and .shx are needed. The .TIFF file is enough in case of raster files.
Data preparation
General
Some of the data preparation aspects apply to both vector and raster data and are explained here. For specifics on vector or raster data please refer to the respective sub-sections below.
- Coordinate Reference System and Projection
Always save your geodata files using the coordinate reference system and projection used in the platform: ETRS89 and Lambert Azimuthal Equal Area (EPSG:3035).
- Geographical area coverage
Are you working on an existing edition of the MSP Challenge?
Make sure that the data layer you are adding to the platform only covers the geographical area of the respective edition, check the table below for each edition's detail on the area covered.
Bounding boxes of each existing MSP Challenge Edition (using EPSG:3035)
| MSP Challenge Edition | South | North | West | East |
|---|---|---|---|---|
| North Sea | 2835279 | 4500000 | 2921000 | 4801000 |
| Baltic Sea | 3767500 | 3327500 | 3767500 | 6120600 |
| Clyde Marine Region | 3627000 | 3790000 | 3256000 | 3478000 |
| Adriatic Sea | 1503000 | 2700000 | 4040000 | 5730450 |
Are you creating a new MSP Challenge Edition?
When creating a new MSP Challenge Edition the first step is to define the "play area". The play area is the total geographical area that will be shown in the platform, it works like a bounding box for all the geodata the MSP Challenge Edition will have. This step is crucial for the whole project. Take into account the coutries involved in the project and their respective planning areas at sea, make sure to include them. The play area needs to follow the naming convention: _PLAYAREA_XX, where XX are the first letters of the region corresponding to that Edition. For example, the Adriatic Edition’s play area is “_PLAYAREA_AS”. The figure below shows the countries and planning areas considered when defining the play area for the MSP Challenge Adriatic Edition. In this case, the play area is much bigger than needed for the Adriatic Sea. This is to make it easier to expand the Adriatic Edition in the future to include the Ionian Sea (South of the Adriatic Sea).

Vector
- Geometry
The shapefile itself can’t have invalid geometries; the platform cannot deal with invalid geometries. Remove duplicated geometries. If possible, avoid subtractive polygons as this can originate problems in the platform. Simplify geometries for use in the platform; aim for files (.shp) to have less than 100 KB.
- Categories
If the dataset has categories, for instance, in a data layer about pipelines, we can have different categories, such as “active” or “inactive”. These are mapped in the platform by using “types”. A field named “type” (all low caps) needs to be introduced in the attributes table; this field needs to store integer values from 0 to n; each value will correspond to a type. It is good practice to also add a “type_1” field with the category description. The type’s name(s) and visualisation options are defined in the Edition’s configuration file (see Customise your session). Check if the types in the configuration file correspond to the types used in the new dataset and update if needed.
- Naming convention
Use the following name convention for vector layers: “RR_Layer_Name”, in which RR are the first letters of the region, for instance, AS for the Adriatic Sea.
Raster
- Raster values
In the MSP Challenge, the rasters’ cells values range from 0 (minimum or no data) to 255 (maximum). To make sure a raster file is displayed correctly in the platform, you need to know the minimum and maximum values in the raster file and optimise its visual settings before saving it as a tiff (rendered image). In the saved image, verify if the “no data” or zero values correspond to black and the maximum values to white. In the configuration file, the layers’ types need to be defined to correspond to the interval values that we want to show in the platform (see configuration file).
- Naming convention
Use the following name convention for raster layers: “RR_Layer_Name_raster”, in which RR are the first letters of the region, for instance, AS for the Adriatic Sea.
Upload the data in MSP Challenge's GeoServer
Before uploading a layer in the MSP Challenge's GeoServer you need to update the configuration file, ensuring that the layers being loaded are included in the file. See how to download the default configuration file and update it at Customise your session (Sections 1, 1.1 and 1.3.4 are the most relevant in this case).
Get in touch if you want to have your geodata available from BUas' GeoServer installation.
[2] https://doc.arcgis.com/en/arcgis-online/reference/shapefiles.htm
[3] https://www.ogc.org/standards/geotiff
[4] https://epsg.io/3035
 Co-funded by the European Union.