No edit summary |
No edit summary |
||
| Line 47: | Line 47: | ||
* In case of a WFS (vector data) ... | * In case of a WFS (vector data) ... | ||
** Setting the linearization tolerance option might be useful for lines or polygons. This is up to you. | ** Setting the linearization tolerance option might be useful for lines or polygons. This is up to you. | ||
** Under 'Restrict the features on layer by CQL filter', add a CQL filter to the play area at hand using the format: | ** Under 'Restrict the features on layer by CQL filter', add a CQL-based filter to the edition's overall bounding box (the play area) at hand using the format: | ||
*** BBOX(ATTR1, 10,20,30,40) | *** BBOX(ATTR1, 10,20,30,40) | ||
** Note that the bounding box extent has to be expressed in EPSG:4326 and goes [https://docs.geoserver.org/latest/en/user/services/wms/basics.html Ymin,Xmin,Ymax,Xmax for WFS/WMS version 1.3.0. or Xmin, Ymin, Xmax, Ymax for version 1.1.0] An example CQL filter using version 1.3.0 for the Eastern Mediterranean Sea: | ** Note that the bounding box extent likely has to be expressed using the ''source's original'' coordinate reference system / projection system (e.g. in EPSG:4326) and goes [https://docs.geoserver.org/latest/en/user/services/wms/basics.html Ymin, Xmin, Ymax, Xmax for WFS/WMS version 1.3.0. or Xmin, Ymin, Xmax, Ymax for version 1.1.0] | ||
** An example CQL filter using version 1.3.0 for the Eastern Mediterranean Sea: | |||
*** BBOX (the_geom, 30,21,42,37) | *** BBOX (the_geom, 30,21,42,37) | ||
** If you also want to filter from any of the feature properties like we did for the bathing water state: | ** If you also want to filter from any of the feature properties like we did for the bathing water state: | ||
Revision as of 10:26, 30 April 2024
Updating or adding a data layer in an MSP Challenge Simulation Platform edition is a two-fold process:
- First, you need to store all the geodata on a single installation of GeoServer, under a single Workspace, with its Web Map Service (WMS) and Web Feature Service (WFS) enabled.
- Second, through a server configuration file, you need to tell the MSP Challenge server what the names of the geodata layers are, at which single GeoServer WMS/WFS installation this is provided, and under which Workspace name.
Adding geodata to a GeoServer installation
A basic explanation of how to use GeoServer is beyond the scope of this page. There are good manuals on the GeoServer website about how to install and configure a new GeoServer installation. It's important you understand that GeoServer organises geodata through Workspaces, under which you can add Data Stores, and under which you can add Layers.
Once you have a GeoServer installation at your disposal, you can start adding geodata to it. GeoServer supports many different geodata standards. You can, for example, manually upload ESRI ShapeFiles of your vector geodata raster TIFF or PNG files into GeoServer. At the end of this page, we provide some notes about manually creating geodata.
Often this won't be what you'll want to do. We know that a lot of geodata is already 'out there', available for anyone to reuse freely.
Connecting to a pre-existing WMS in your GeoServer:
- Go to your GeoServer management web interface (usually accessible through /geoserver), logging in with a full administrator-privileged user.
- Click on Stores > Add new Store to start the process of adding a new data store.
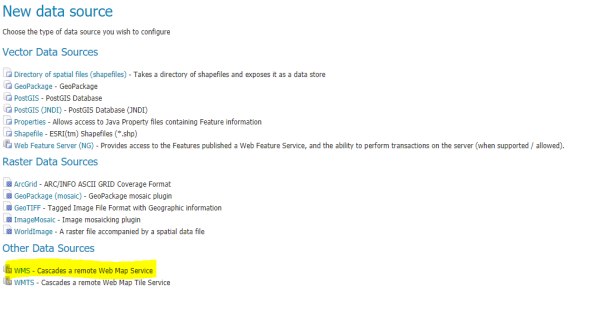
- In the New data source options list, choose the WMS cascade option under Other Data Sources.
- In the form that shows up, you'll first need to select a Workspace for this data store. For MSP Challenge, all your geodata (vector or raster) will need to be in the same Workspace. If you like, you can first create a new Workspace first by going to Workspaces > Add new Workspace, as long as you then reuse that newly created Workspace for all the geodata you want to pull in through your MSP Challenge configuration file (explained further below).
- Under WMS Source Name, enter a name for this new data store. You will need to use this name when you add a new data layer later on.
- A Description is optional. Write anything you like or need.
- Make sure the Enabled box is checked.
- Under Capabilities URL, enter the WMS base URL of the service you are accessing. An example of a fully-qualified WMS base URL is: https://ows.emodnet-bathymetry.eu/wms This is the Web Map Service of EMODnet Bathymetry.
- All other fields in the form are optional and can be left as is. This includes things such as username, password, and connection parameters. We do recommend switching off connection pooling by removing the checkbox at Use HTTP Connection Pooling.
- Click on Save.

Connecting to a pre-existing WFS in your GeoServer:
- Go to your GeoServer management web interface (usually accessible through /geoserver), logging in with a full administrator-privileged user.
- Click on Stores > Add new Store to start the process of adding a new data store.
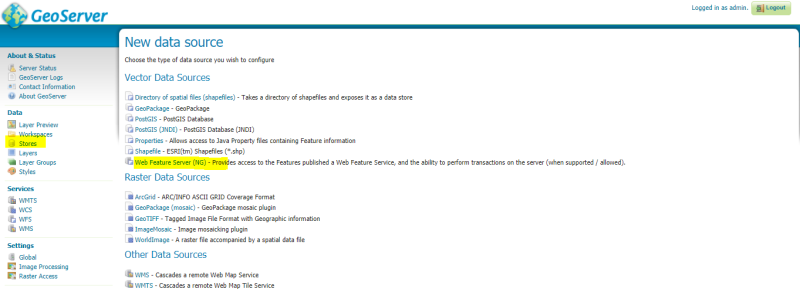
- In the New data source options list, choose Web Feature Server (NG) under Vector Data Sources.
- In the form that shows up, you'll first need to select a Workspace for this data store. For MSP Challenge, all your geodata (vector or raster) will need to be in the same Workspace. If you like, you can first create a new Workspace first by going to Workspaces > Add new Workspace, as long as you then reuse that newly created Workspace for all the geodata you want to pull in through your MSP Challenge configuration file (explained further below).
- Under Data Source Name, enter a name for this new data store. You will need to use this name when you add a new data layer later on.
- A Description is optional. Write anything you like or need.
- Make sure the Enabled box is checked.
- Under WFS GetCapabilities URL, enter the WFS base URL of the service you are accessing. An example of a fully-qualified WFS base URL is: https://ows.emodnet-seabedhabitats.eu/geoserver/emodnet_open/wfs This is the Web Feature Service of EMODnet Seabed Habitats.
- All other fields in the form are optional and can be left as is. This includes things such as username, password, and connection parameters. We do recommend switching off connection pooling by removing the checkbox at Use Connection Pooling.
- Click on Save.

Adding the geodata layer from the pre-existing WMS or WFS:
- Now you need to retrieve an actual geodata layer from the new WMS or WFS data stores. So make sure you are still in your GeoServer management web interface (usually accessible through /geoserver), as a full administrator-privileged user.
- Go to Layers > Add a new layer.
- In the drop-down list, select the name of the data store, as you provided a couple of steps up under WMS Source Name.
- If the WMS base URL was correct, GeoServer will query it now immediately and provide a list of layers that this WMS source actually provides.
- Select the layer you actually want, and click on the Publish button to the right of it.
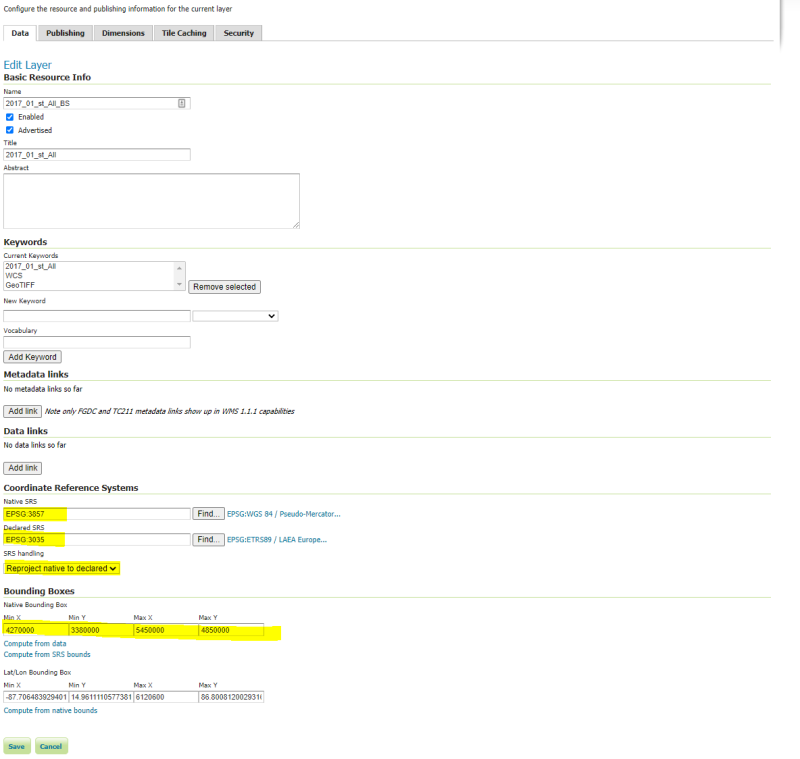
- Check the native coordinate reference system of this data layer, and select the declared coordinate reference system to whatever is required for the particular MSP Challenge configuration file. Usually this is EPSG:3035 (ETRS89 and Lambert Azimuthal Equal Area), but do check with the projection variable in the configuration file at hand. Either way, make sure the coordinate reference system handling is selected as "reproject native to declared".
- Under Bounding Boxes, you can press Compute From Data and Compute From Native Bounds to automatically retrieve the appropriate values. If you only want a part of the image you can enter the bounds of the box you want to retrieve, using of course the coordinate reference system at hand (e.g. EPSG:3035).
- In case of a WFS (vector data) ...
- Setting the linearization tolerance option might be useful for lines or polygons. This is up to you.
- Under 'Restrict the features on layer by CQL filter', add a CQL-based filter to the edition's overall bounding box (the play area) at hand using the format:
- BBOX(ATTR1, 10,20,30,40)
- Note that the bounding box extent likely has to be expressed using the source's original coordinate reference system / projection system (e.g. in EPSG:4326) and goes Ymin, Xmin, Ymax, Xmax for WFS/WMS version 1.3.0. or Xmin, Ymin, Xmax, Ymax for version 1.1.0
- An example CQL filter using version 1.3.0 for the Eastern Mediterranean Sea:
- BBOX (the_geom, 30,21,42,37)
- If you also want to filter from any of the feature properties like we did for the bathing water state:
- BBOX (the_geom, 10,20,45,45) AND "year"='2022'
- You will need to see if the variable at hand, in this case the year, should be an integer or a string (in case of the latter, use '2022' as shown). For more information, check out this documentation:
- Go to the next Publishing tab.
- In case of a WMS (raster data), select PNG extension to ensure MSP Challenge can obtain the raster as a PNG file. You may also save an attribution text and set up a logo, etc. but this is all optional.
- In case of a WFS (vector data), select an appropriate style under Available Styles. The options are set by your WFS provider, so you'll have to find out from there what style options are available and which one you'll want to use. You'll probably only need one.
- Click on Save.

Configuring MSP Challenge to get the geodata from GeoServer
Setting up your session configuration file
How to deal with the configuration file is covered in Customise your session. The full configuration file schema documentation might also be of interest.
In the end, you'll need to do the following to your configuration file:
- Enter the name of your chosen GeoServer Workspace for all the data layers under datamodel > region.
- Enter the names of each of your layers as stored on GeoServer under datamodel > meta > layer_name.
- And if relevant, make sure the chosen coordinate reference system, or projection system, for all your data layers, is set under datamodel > projection, in the required PROJ.4 format.
Selecting the right GeoServer installation
When you want to use your configuration file in the Server Manager web application to actually create a new server session with it (e.g., a new North Sea edition session), make sure you select the right GeoServer. The default is BUas' own GeoServer, which we offer for all the default editions we ship with the server software (North Sea, Baltic Sea, etc). If you have set up your own GeoServer, then first add it to the Server Manager by going to the GeoServers tab, and clicking on Add. Then, when you create a new session, select that newly created GeoServer from the list.
Notes about manual vector and raster geodata creation
Are you working on an existing edition of the MSP Challenge?
Make sure that the data layer you are adding to the platform only covers the geographical area of the respective edition, check the table below for each edition's detail on the area covered.
Bounding boxes of each existing MSP Challenge Edition (using EPSG:3035)
| MSP Challenge Edition | South | North | West | East |
|---|---|---|---|---|
| North Sea | 2835279 | 4500000 | 2921000 | 4801000 |
| Baltic Sea | 3767500 | 3327500 | 3767500 | 6120600 |
| Clyde Marine Region | 3627000 | 3790000 | 3256000 | 3478000 |
| Adriatic Sea | 1503000 | 2700000 | 4040000 | 5730450 |
Are you creating a new MSP Challenge Edition?
When creating a new MSP Challenge Edition the first step is to define the "play area". The play area is the total geographical area that will be shown in the platform, it works like a bounding box for all the geodata the MSP Challenge Edition will have. This step is crucial for the whole project. Take into account the countries involved in the project and their respective planning areas at sea, make sure to include them. The play area needs to follow the naming convention: _PLAYAREA_XX, where XX are the first letters of the region corresponding to that Edition. See also the configuration file documentation.
For example, the Adriatic Edition’s play area is “_PLAYAREA_AS”. The figure below shows the countries and planning areas considered when defining the play area for the MSP Challenge Adriatic Edition. In this case, the play area is much bigger than needed for the Adriatic Sea. This is to make it easier to expand the Adriatic Edition in the future to include the Ionian Sea (South of the Adriatic Sea).

Vector
Geometry
When working with ESRI ShapeFiles, it can’t have invalid geometries; the platform cannot deal with invalid geometries. Remove duplicated geometries. If possible, avoid subtractive polygons as this can originate problems in the platform. Simplify geometries for use in the platform; aim for files (.shp) to have less than 100 KB.
Naming convention
We recommend using the following name convention for vector layers: “RR_Layer_Name”, in which RR are the first letters of the region, for instance, AS for the Adriatic Sea.
Raster
Raster values
In the MSP Challenge, the rasters’ cells values range from 0 (minimum or no data) to 255 (maximum). To make sure a raster file is displayed correctly in the platform, you need to know the minimum and maximum values in the raster file and optimise its visual settings before saving it as a tiff (rendered image). In the saved image, verify if the “no data” or zero values correspond to black and the maximum values to white. In the configuration file, the layers’ types need to be defined to correspond to the interval values that we want to show in the platform (see configuration file).
Naming convention
We recommend using the following name convention for raster layers: “RR_Layer_Name_raster”, in which RR are the first letters of the region, for instance, AS for the Adriatic Sea.
We finally recommend looking at the meta part of the configuration file documentation, particularly the parts explaining how you can map geodata properties to layer types.
 Co-funded by the European Union.