(embed 4 videos of main features only - just to prevent mental overload: layer manager, properties, creating a plan, edit basic. For further development video embedding and image uploading must be supported)
UI Layout
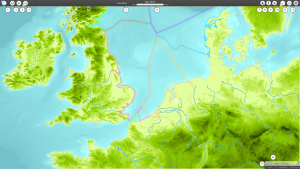
| Number | Function |
|---|---|
| 1 | Knowledge database, you can find more information about any given subject covered in the game. |
| 2 | Toggle layer manager, turn on and off certain layers to reveal information |
| 3 | Create a new plan, layout new plans and see their effects |
| 4 | Plan monitor, see what plans have been made by other players |
| 5 | Time manager |
| 6 | Date + Time left in the session |
| 7 | Shows KPI related to shipping in the current session compared to the start of the session |
| 8 | Shows KPI related to the power grid in the current session compared to the start of the session |
| 9 | Shows KPI related to the ecology in the current session compared to the start of the session |
| 10 | Objectives monitor, track changes and your current objectives here alongside the progress made towards said objectives |
| 11 | Active layers, toggle visibility of layers that you turned on and also turn them off again. |
| 12 | Game Settings, change settings of your client or close the game |
| 13 | The current level of zoom |
| 14 | Reference scale |
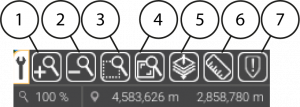
| Number | Function |
|---|---|
| 1 | Zoom in |
| 2 | Zoom out |
| 3 | Zoom to area, select a certain area to immediately zoom in towards it |
| 4 | Zoom out completely, return to the full plan area |
| 5 | Layer probe, discover which layers are below your cursor and select the layer you need |
| 6 | Ruler, measure distances in both kilometres (KM) and nautical miles (NM) |
| 7 | Show/hide issue markers, show/hide markers where conflicts arise between planned and current infrastructure |
Main features
When starting with a new group of people to play the MSP game for the first time, there are several main features to be aware of:
Layers
The layer manager controls which layers and by extension what information is shown to the player at any given time. Layers can be toggled on or off by clicking on them followed by a change on the main map. Multiple layers can be active at any given time and their information will thus be layered on top of each other. Some layers are static (information that is displayed will not change regardless of input) and dynamics (information displayed will change based on previous actions by the players).
When activating a layer, the active layer can be opened. Every active layer has a drop-down menu that contains both the legend for the selected layer and an eye icon that can be used to toggle on or off certain parts of the layer, which might help the player to make a more educated decision for their plans and filter out the unnecessary clutter.
Properties
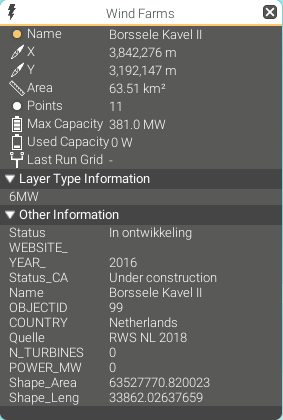
When selecting a part of a layer, a pop up will appear and reveal information about the selected layer.
Based on the layer selected, the game will show you the available information for the selected object. It will always show the name followed by the X and Y coordinates. If the object selected covers an area it will also display the total area it covers alongside the number of points it uses as corners.
Creating a new plan
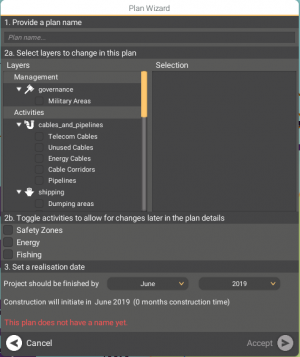
In the bottom left corner of the screen is an option that allows for a player to design and propose a design they made. By clicking “create plan” a few new UI elements become available and the plan wizard opens. Here you can define a name for the new plan you will design, set what you will design/use in your design and when the plan should be fully executed, and the product should be fully operational.
Once everything is defined, the wizard closes, and you get a few more options. Namely to start editing your plan. The plans monitor will also show your new plan and keep track of it over its duration. By selecting “start editing plan” you can bring changes to your plan and design it the way you want.
By clicking create you can create a new point, line or zone based on what you currently have selected in the left window (In the example shown wind farms are currently selected):
- If a point object is selected, click where you want to add such an object to add it to the plan.
- If a line is selected, click on the starting position and proceed to click to add intermediate stations (where the line can be bent). To finish the line click on an endpoint shown by a circle above the cursor.
- If a polygon is selected, click on the starting position and proceed to click elsewhere to create the outlines of the polygon. Click on the starting point again to close the zone and to finish it.
- If you wish for a shape to be removed, click on it and press “delete" to remove it upon the project's completion.
- Shapes that were previously created during the same plan can simply be undone by pressing “undo” or selecting them and clicking delete.
If you want to edit a currently existing shape, click on the shape you wish to edit to select it and press “edit”. After that click on where you want to adjust the shape (a new point will be created on that location) and proceed to drag the point around into the shape you want.
When you are satisfied with the changes made to the model you can select “accept”. This will prompt the plans to monitor to open again and show your plan as shown:
(Insert screengrab here (MSP 6.2))
| Number | Function |
|---|---|
| 1 | All proposed plans and their current state sorted by their current state |
| 2 | Team colour of who proposed this plan |
| 3 | Name of the plan |
| 4 | When the plan is to be fully implemented |
| 5 | Which design phase the project is in, ranging from Design, consultation, awaiting approval, approved, implemented and Archived |
| 6 | The yield of the plan for every involved player |
| 7 | Players can communicate and discuss the currently selected plan under the “Official communication” tab |
| 8 | Plans that work with power will show the distribution of power to each player here alongside with the amount of power |
| 9 | If the plan intersects current infrastructure or otherwise runs into problems, the player will be notified under the “Issues” tab |
| 10 | Cancel the current plan, rolling back all changes to the model made |
| 11 | Accept the plan in its current iteration and allows for it to be implemented |
To get your plans to be implemented, mark them as approved. Sometimes however a plan will cross into another player’s territory which means that that player also has to agree to the plan before it can be implemented. Once a plan is implemented (or in construction phase is applicable) its effects can be seen in the objectives monitor alongside the progress made towards each player’s objectives or in the dedicated KPI window.

 Co-funded by the European Union.