| Line 86: | Line 86: | ||
== Nginx proxy example == | == Nginx proxy example == | ||
In /etc/nginx/conf.d/maps.conf: | Note that this example assumes a Nginx installation *without* Docker. See: https://nginx.org/en/linux_packages.html#instructions | ||
To validate Nginx configuration after changes (like adding below example files), run: | |||
nginx -t | |||
To reload Nginx configuration: | |||
service nginx reload | |||
This chapter shows an example configuration of a Nginx reverse-proxy that listens to http(s) web - and (wss) web socket requests for particular domains, and redirects to particular ports running particular Docker containers accordingly. In this example we have multiple MSP Challenge servers running on different docker container using different ports. If a MSP Challenge client connection is encountered, the version of the connected client will dictate to which port to redirect to. | |||
File /etc/nginx/conf.d/maps.conf: | |||
## | ## | ||
<nowiki>#</nowiki> Connection header for web socket reverse proxy | <nowiki>#</nowiki> Connection header for web socket reverse proxy | ||
| Line 106: | Line 113: | ||
<nowiki> </nowiki> "4.0.2" "<nowiki>http://127.0.0.1:45003</nowiki>"; | <nowiki> </nowiki> "4.0.2" "<nowiki>http://127.0.0.1:45003</nowiki>"; | ||
} | } | ||
File /etc/nginx/sites-enabled/server.mspchallenge.info: | |||
server.mspchallenge.info: | |||
server { | server { | ||
server_name server.mspchallenge.info; | server_name server.mspchallenge.info; | ||
| Line 144: | Line 149: | ||
listen 80; | listen 80; | ||
server_name server.mspchallenge.info; | server_name server.mspchallenge.info; | ||
} | |||
It is assumed that the file /etc/nginx/nginx.conf contains these lines to include any newly created configuration files: | |||
http { | |||
# .... some other lines | |||
include /etc/nginx/conf.d/*.conf; | |||
include /etc/nginx/sites-enabled/*; | |||
} | } | ||
Revision as of 19:41, 1 July 2025
Installation from scratch
The following instructions assume you have a clean Linux machine at your disposal, with absolutely nothing (else) running on it as yet.
Of course, this might not be the case. You might already have a Linux machine running Docker containers of other applications. We then assume you have a web server running (such as Nginx) that listens to http(s) web requests for particular domains, and redirects to particular ports running particular Docker containers accordingly. You can also accomplish this by using the Nginx reverse-proxy Docker container. We at BUas are also using a Nginx proxy, allowing us to run multiple versions of the server behind the same server.mspchallenge.info URL . If you are interested in such a setup, see our example in the "Nginx proxy example" chapter later on.
So back to the initial assumption: you have a clean Linux machine with absolutely nothing (else) running on it yet. In this case, to get the MSP Challenge server up and running on Linux, in the form of Docker containers, please do the following:
- Get your hands on a (sub-)domain name and make sure it refers to the IP address of your Linux machine. This means defining an A record in the domain's DNS settings, through some DNS-setting tool that your domain or hosting provider should provide.
- Log on to your Linux machine using SSH. You could use Putty for this, a free SSH client for Windows. Be sure the account you use to log onto the machine has full superuser privileges. If needed, it's easiest if you switch to the root user by running:
sudo -i
- Make sure the Linux package index and then the actual Linux packages are all up-to-date. Type and enter the following command:
apt-get update -y && apt-get upgrade -y
- If still needed*, follow these instructions to install the Docker Engine on your Linux machine: https://docs.docker.com/engine/install/ubuntu/ There are multiple ways of doing it, we always like to use the apt repository. It should be pretty straightforward - a matter of pasting and running a handful of commands (~5 minutes). (* this won't be needed if you're using e.g. MS Azure's Docker on Linux operating system image
- Next, install PHP and Unzip Type and enter the following command:
apt-get install php-fpm unzip -y
- Now obtain the MSP Challenge Server code. Download the latest "Source code (zip)" from the GitHub releases-page. Copy the download link to your clipboard and use it in the command below, it'll download the code into a newly created subfolder MSPChallenge-Server-x.x.x in your current working directory. e.g. using curl, and using version 5.0.0 Source code (zip) download link:
curl -L -o MSPChallenge-Server.zip https://github.com/BredaUniversityResearch/MSPChallenge-Server/archive/refs/tags/5.0.0.zip && unzip MSPChallenge-Server.zip && rm MSPChallenge-Server.zip
- Get into the MSPChallenge-Server subfolder. This will be different depending on the version, e.g.:
cd MSPChallenge-Server-5.0.0
- In it, create a new file called .env.local (indeed, this file has a name that starts with a dot, that is correct), and edit it using something like NANO:
nano .env.local
- Assuming you're familiar enough with these kinds of text file editors, paste the following text into the file and replace the 'your.domainname.here' part with your chosen (sub-)domain name for the server (see the very first bullet at the top of this page). Of course, be sure to save and close the file when you're done. Note that from release 4.0.2 the line WEB_SERVER_HOST should be removed.
SERVER_NAME=your.domainname.here
URL_WEB_SERVER_PORT=443
URL_WS_SERVER_PORT="${URL_WEB_SERVER_PORT}"
URL_WEB_SERVER_SCHEME=https
URL_WS_SERVER_SCHEME=wss
URL_WS_SERVER_URI=/ws/
APP_ENV=prod
URL_WEB_SERVER_HOST="${SERVER_NAME}"
URL_WS_SERVER_HOST="${SERVER_NAME}"
- Advanced Docker users will surely recognize the opportunities for customizing the Docker container setup here. Indeed, through all sorts of environment variables you can define the schemes, port numbers and host names of the different containers that make up the entire MSP Challenge Server solution. If you're interested in this (perhaps because you want to use a Linux machine that has other Docker containers running as well - see the top of this page), then have a look in the docker-aliases.sh file (specifically the 'dcu' alias definition) for more information.
- You're ready to get the Docker containers built, up and running. We've created a bunch of short commands to help you with that. To enable these commands, run the following:
source docker-aliases.sh
- The above will enable you to run the following alias for a much longer Docker Compose Up Production command, which is nice. Just type and enter:
dcup
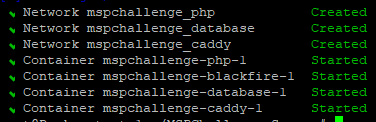
- It typically takes a couple of minutes for all the Docker containers to get built, up and running. By the end you should see something like this:

You might need to give the container another minute or two, but after that you should be able to open up the Server Manager application in your browser under your Linux machine's domain name, something like:
https://your.domainname.here/ServerManager
You might first get redirected to the MSP Challenge Authoriser application prompting you to log in with your MSP Challenge account. This might not happen if you already did that in your current browser session (as we have a Single Sign-On functionality).
Either way, you should end up seeing the New Server Installation message of the Server Manager application. You can now go ahead and set up your first new game session. If you're not familiar with this, then follow the instructions on this page.
That should be it!
Uninstallation
You might want or need to uninstall and remove the Docker containers at some point, if only to reinstall everything again afterwards (with or without an alteration in the Docker configuration). Here's how we do this at BUas:
- First you need to stop the Docker containers. For that you need to know the container IDs:
docker ps
- You should see something like this:

- You can now stop the containers with the following command, replacing <ID> with the actual container IDs (paste them in, separated by a space):

docker stop <ID> <ID> <ID>
- Then you can completely remove the containers in a similar way:
docker rm <ID> <ID> <ID>
- Finally, you can remove the image in a similar way, only this time you should use the image name (e.g. mspserver-caddy):
docker rmi <IMAGE> <IMAGE> <IMAGE>
Of course you could now also delete the entire MSPChallenge-Server subfolder you originally retrieved through Git as well.
Alternatively, if you did this to just upgrade your MSP Challenge Server, then you now can pull in the latest code changes by running the following within the MSPChallenge-Server subfolder:
git pull
...and then you can rebuild the containers again with the aforementioned 'dcup' command (see above).
Nginx proxy example
Note that this example assumes a Nginx installation *without* Docker. See: https://nginx.org/en/linux_packages.html#instructions
To validate Nginx configuration after changes (like adding below example files), run:
nginx -t
To reload Nginx configuration:
service nginx reload
This chapter shows an example configuration of a Nginx reverse-proxy that listens to http(s) web - and (wss) web socket requests for particular domains, and redirects to particular ports running particular Docker containers accordingly. In this example we have multiple MSP Challenge servers running on different docker container using different ports. If a MSP Challenge client connection is encountered, the version of the connected client will dictate to which port to redirect to. File /etc/nginx/conf.d/maps.conf:
##
# Connection header for web socket reverse proxy
##
map $http_upgrade $connection_upgrade {
    default upgrade;
    ''      close;
}
# web proxy targets for connections with different versions of the client
map $http_msp_client_version $backend {
    default "http://127.0.0.1:45082";
    "5.0.0" "http://127.0.0.1:45081";
    "4.0.2" "http://127.0.0.1:45080";
}
# web socket proxy targets for connections with different versions of the client
map $http_msp_client_version $ws_backend {
    default "http://127.0.0.1:45007";
    "5.0.0" "http://127.0.0.1:45005";
    "4.0.2" "http://127.0.0.1:45003";
}
File /etc/nginx/sites-enabled/server.mspchallenge.info:
server {
    server_name server.mspchallenge.info;
    location /.well-known {
        root /var/www/certbot;
    }
    client_max_body_size 100M;
    client_body_buffer_size 16K;
    location / {
        proxy_set_header X-Forwarded-For        $proxy_add_x_forwarded_for;
        proxy_set_header X-Forwarded-Proto      $scheme;
        proxy_set_header X-Real-IP              $remote_addr;
        proxy_set_header Host                   $http_host;
        proxy_pass       $backend;
    }
    location /ws/ {
        proxy_pass $ws_backend;
        proxy_http_version 1.1;
        proxy_set_header Upgrade $http_upgrade;
        proxy_set_header Connection $connection_upgrade;
    }
    listen [::]:443 ssl ipv6only=on; # managed by Certbot
    listen 443 ssl; # managed by Certbot
    ssl_certificate /etc/letsencrypt/live/server.mspchallenge.info/fullchain.pem; # managed by Certbot
    ssl_certificate_key /etc/letsencrypt/live/server.mspchallenge.info/privkey.pem; # managed by Certbot
    include /etc/letsencrypt/options-ssl-nginx.conf; # managed by Certbot
    ssl_dhparam /etc/letsencrypt/ssl-dhparams.pem; # managed by Certbot
}

server {
    if ($host = server.mspchallenge.info) {
        return 301 https://$host$request_uri;
    } # managed by Certbot
    listen [::]:80;
    listen 80;
    server_name server.mspchallenge.info;
}
It is assumed that the file /etc/nginx/nginx.conf contains these lines to include any newly created configuration files:
http {
    # .... some other lines
    include /etc/nginx/conf.d/*.conf;
    include /etc/nginx/sites-enabled/*;
}
 Co-funded by the European Union.